(Hướng dẫn tiếng Việt bên dưới)
According to official regulations from the Government, to ensure the safety of user information abroad and prevent illegal activities, please verify your identity (KYC) before using your eSIM.
📌 Need Support?
If you encounter any issues during the KYC process, contact Gohub Customer Service via:
Email: [email protected]
WhatsApp: +1 (302) 899-2888
Notice!
- Please install the eSIM and identity verification (KYC) 2 – 3 hours before your flight.
- The KYC verification process will take approximately 30 minutes to 1 hour.
- Once KYC is successful on one device, the eSIM cannot be transferred to another device.
- Please ensure you have an internet connection during the KYC process. Items you will need: Passport; Phone with front and rear cameras.
- Please take a full photo of the front of your passport, including the code at the bottom. Do not cover any part of the passport.
- When taking the photo, avoid any obstructions, reflections, and shadows on the passport. Place the passport on a flat surface to take the photo.
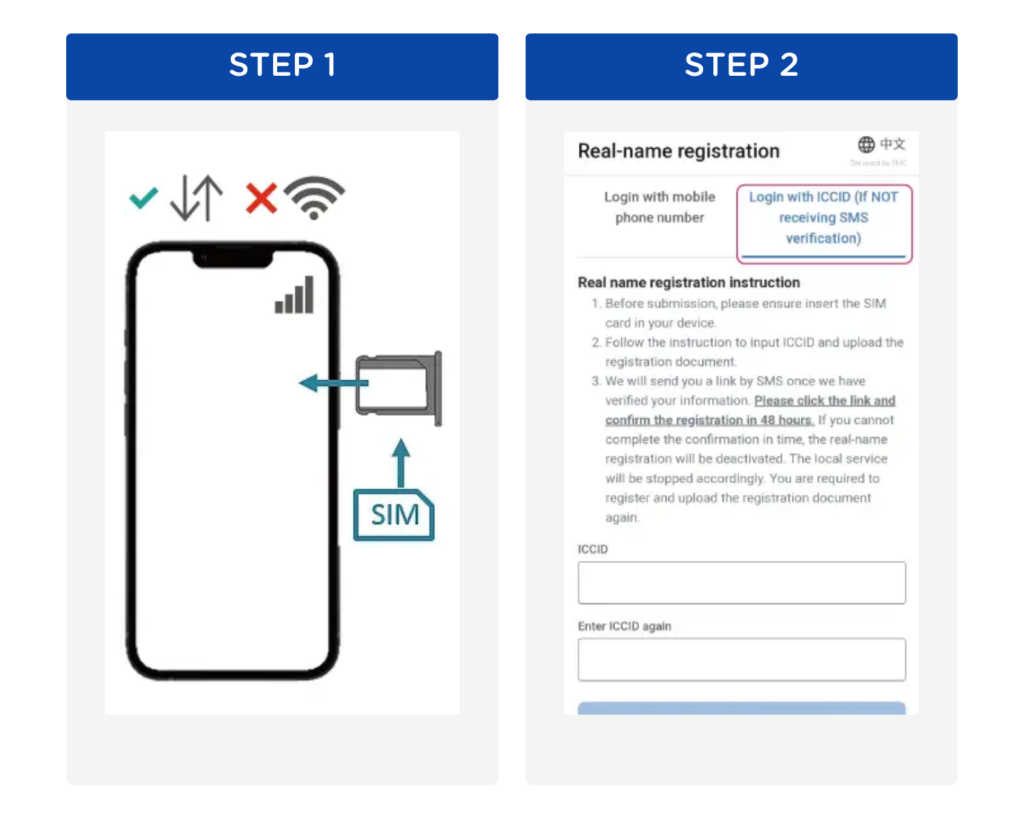
Step 1: Install eSIM into your mobile device, enable Mobile Data and turn off Wi-Fi to connect to mobile network
Step 2: Visit website https://www.three.com.hk/prepaid/account/en/rnr-reg and select “Login with ICCID” to login
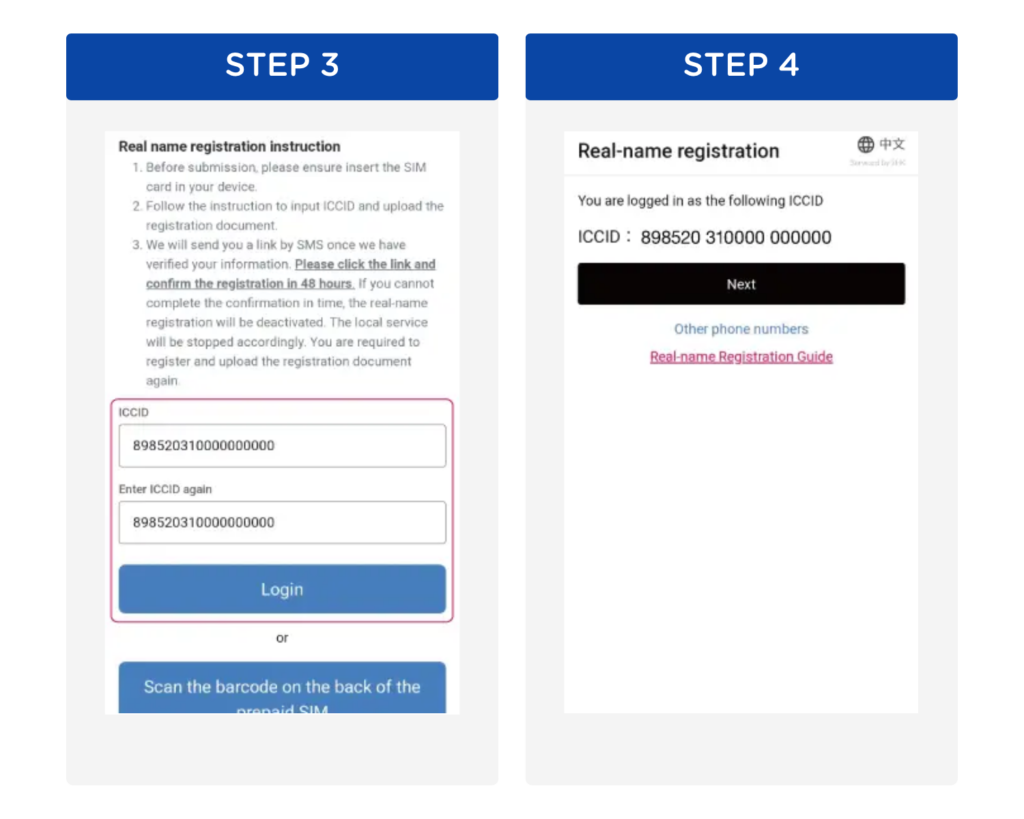
Step 3: Enter the ICCID code with the prefix 89852 twice (The ICCID code is the Product code provided in the successful order email) > Click Login.
Step 4: Verify the ICCID, then click “Next”
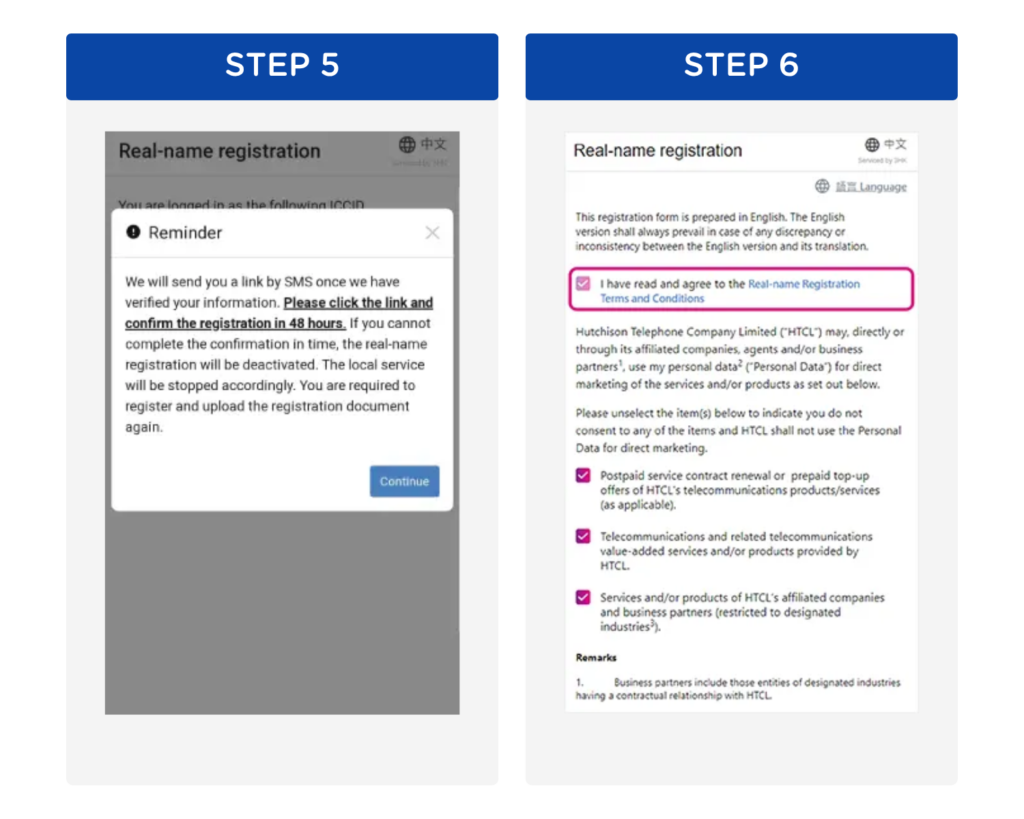
Step 5: Read the reminder and press “Continue”
Step 6: Read real-name registration terms and conditions and privacy policy before going to the next step
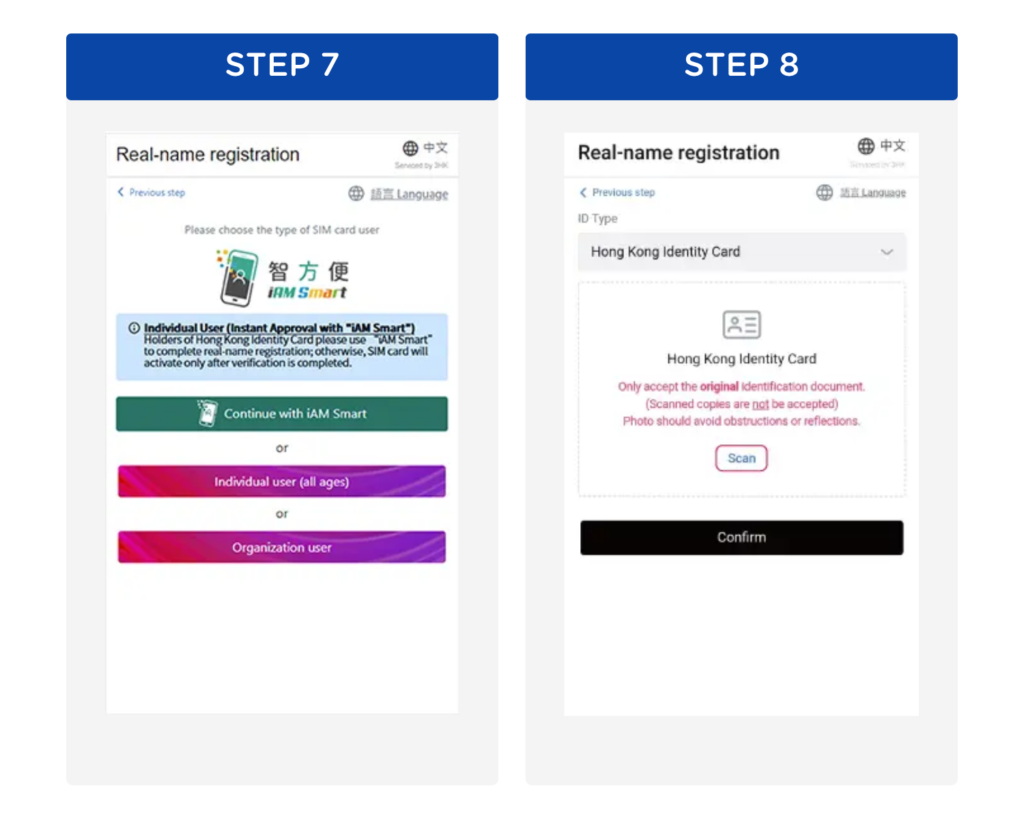
Step 7: Choose “The type of SIM card user”
Step 8: Choose “ID Type” and press “Scan”
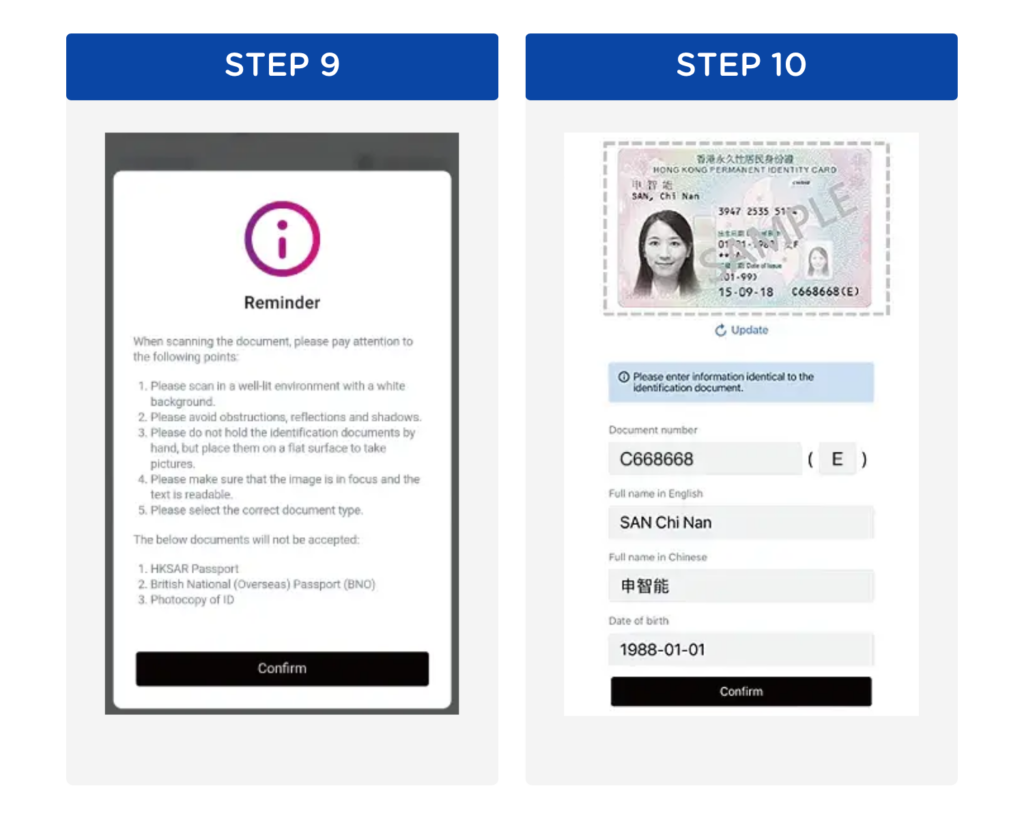
Step 9: Refer to the reminder for scanning ID > “Confirm” to start scanning
(Reminder: If autofill information is incorrect, please click “Update” to rescan. All manual changes will be manually assessed, requiring a longer processing time)
Step 10: After successful scan, the system will fill in the information automatically
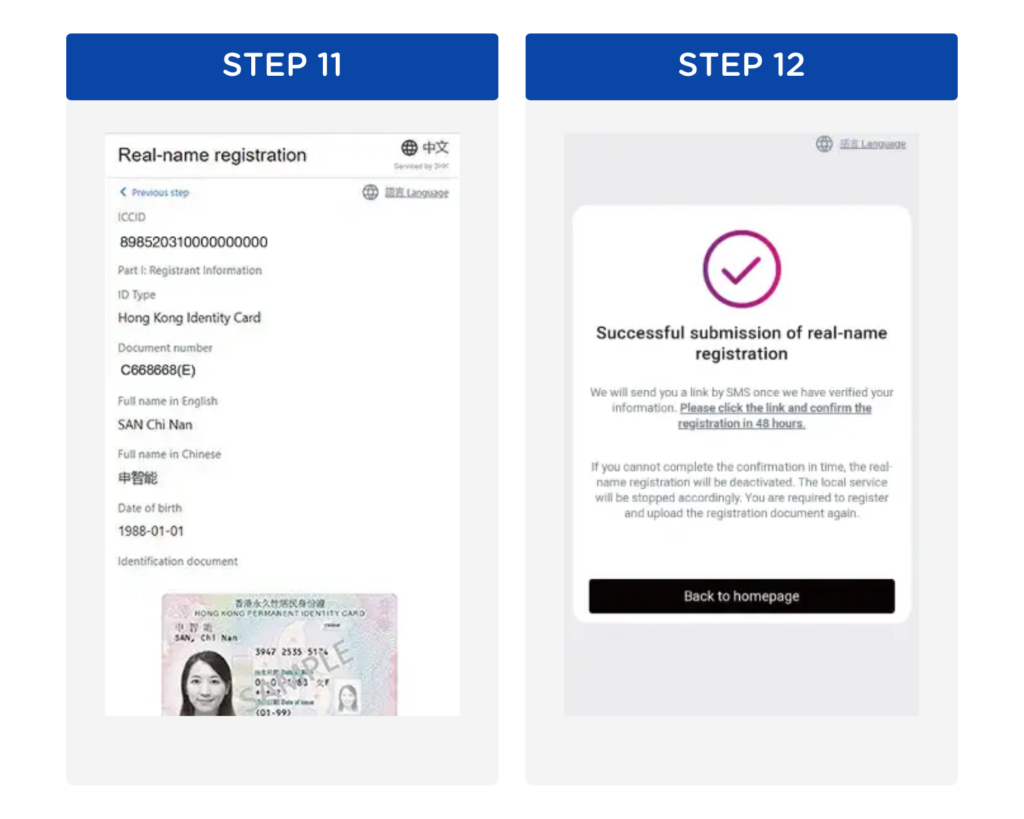
Step 11: Verify your information before submission
Step 12: Completed submission of real-name registration. A verification link will be sent via SMS to your prepaid number once your information is verified. Please click the link and confirm your registration in 48 hours
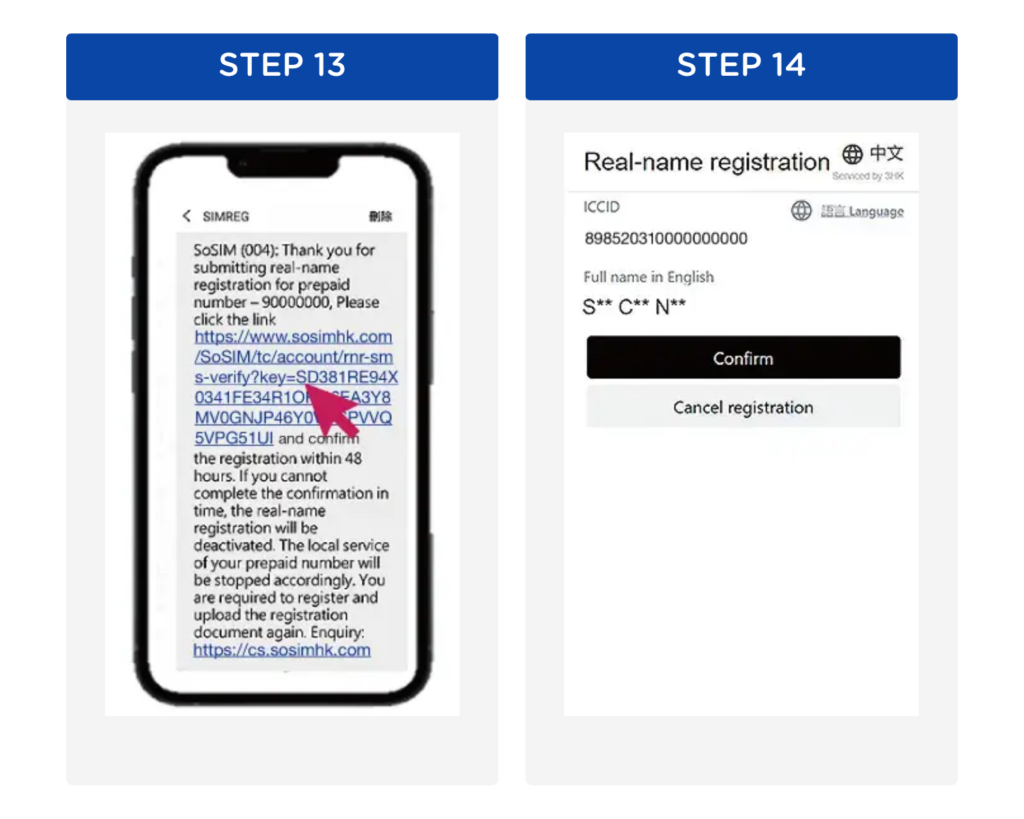
Step 13: Click the link to complete the real-name registration after receiving SMS verification
Step 14: Verify the information, then press “Confirm”
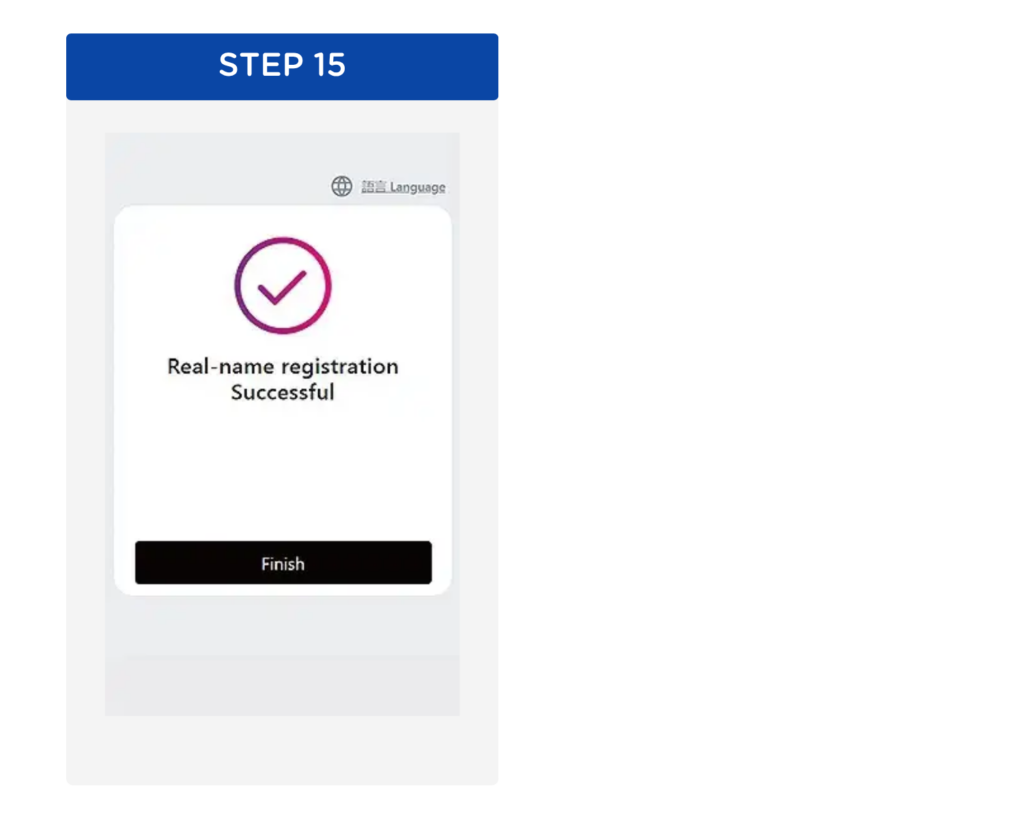
Step 15: Real-name registration successful
HƯỚNG DẪN TIẾNG VIỆT
Theo quy định chính thức từ Chính phủ, để đảm bảo an toàn thông tin người dùng tại nước ngoài và phòng chống các hoạt động phi pháp, quý khách vui lòng xác minh danh tính (KYC) trước khi sử dụng eSIM.
📌 Cần hỗ trợ?
Nếu bạn gặp bất kỳ sự cố nào trong quá trình xác minh KYC, hãy liên hệ Bộ phận Hỗ trợ của Gohub qua:
Email: [email protected]
Hotline | Zalo: +84 8 6644 0022
Lưu ý!
- Quý khách vui lòng cài đặt eSIM và xác minh danh tính (KYC) từ 2 – 3 tiếng trước khi bay.
- Thời gian xác nhận thông tin KYC sẽ khoảng từ 30 phút – 1 tiếng.
- eSIM sau khi KYC trên một thiết bị thì không được chuyển sang thiết bị khác.
- Cần đảm bảo kết nối mạng khi tiến hành KYC. Vật dụng cần chuẩn bị: Hộ chiếu; Điện thoại có camera trước và sau.
- Vui lòng chụp toàn bộ mặt trước hộ chiếu, bao gồm cả mã ở phía dưới, không được che bất kì phần nào.
- Khi chụp ảnh, tránh các vật cản, phản chiếu và bóng tối lên hộ chiếu, đặt hộ chiếu trên bề mặt phẳng để chụp ảnh.
Bước 1: Cài đặt eSIM vào điện thoại, bật Dữ liệu di động và tắt Wi-Fi để kết nối với mạng di động
Bước 2: Truy cập website https://www.three.com.hk/prepaid/account/en/rnr-reg và chọn “Login with ICCID” để tiếp tục
Bước 3: Nhập lại hai lần mã ICCID bắt đầu bằng 89852 (Mã ICCID chính là Mã sản phẩm được cung cấp trong email nhận eSIM), sau đó nhấn “Login”
Bước 4: Xác minh mã ICCID, sau đó nhấn “Next”
Bước 5: Đọc kỹ thông báo và nhấn “Continue”
Bước 6: Đọc điều khoản và chính sách bảo mật về đăng ký thông tin thuê bao, sau đó chuyển sang bước tiếp theo
Step 7: Chọn “The type of SIM card user” (Kiểu người dùng SIM) – Cá nhân (Individual user) hoặc Tổ chức (Organization user)
Step 8: Chọn “ID Type” (Loại giấy tờ tùy thân) và nhấn “Scan”
Bước 9: Làm theo hướng dẫn để scan giấy tờ tùy thân > nhấn “Confirm” để bắt đầu scan
(Lưu ý: Nếu thông tin tự động điền không chính xác, vui lòng nhấn “Update” để scan lại. Mọi chỉnh sửa thủ công sẽ được xét duyệt thủ công và có thể mất thời gian lâu hơn)
Bước 10: Sau khi scan thành công, hệ thống sẽ tự động điền thông tin
Bước 11: Kiểm tra lại thông tin của bạn trước khi gửi
Bước 12: Hoàn tất việc gửi đăng ký thông tin. Một liên kết xác minh sẽ được gửi qua SMS tới số điện thoại trả trước của bạn sau khi nhà mạng xác minh thông tin. Vui lòng nhấn vào liên kết đó và hoàn tất xác nhận trong vòng 48 giờ
Bước 13: Nhấn vào liên kết sau khi nhận được SMS để hoàn tất đăng ký
Bước 14: Kiểm tra lại thông tin và nhấn “Confirm”
Bước 15: Đăng ký thông tin thuê bao thành công